Flying the 2023 Sportsman Sequence – Part 2 - The Wedge

Let’s talk about the Wedge maneuver, sometimes called the Shark’s Tooth or the Sawtooth. Making the Wedge look good, takes some effort, despite its attempt to masquerade as a simple figure. What follows is some nuts and bolts, but with practice this maneuver can be fun and invigorating.
In all of the following explanations we’ve had to assume that the airplane being used has inverted fuel and oil systems, as well as inverted structural capability.
Overview
The Wedge is a Family 1 figure, which means that the 3 partial loops, or radii (radius plural is ray-dee-eye, not ray-dee-uss-uzzz) do not have to be the same size. With that being said you must still have enough energy to draw a constant radius across the top. Float across the top. Do not flop. A non – constant radius across the top is a downgrade.
Second, the lines within the figure do not have to be the same length. That is another feature of Family 1 figures. It will be very hard, though, for low horsepower/high drag aircraft to have enough energy to show the vertical line and to also draw a constant radius across the top. That is two requirements, or two ‘jobs.’
Start this maneuver fast, as fast as you can. Put the wedge and the previous maneuver close enough together to ensure that you can feed enough energy into the Wedge to do both jobs. The vertical line does not have to be any minimum length, but the judges have to see it. Ground coaching will help you with this.
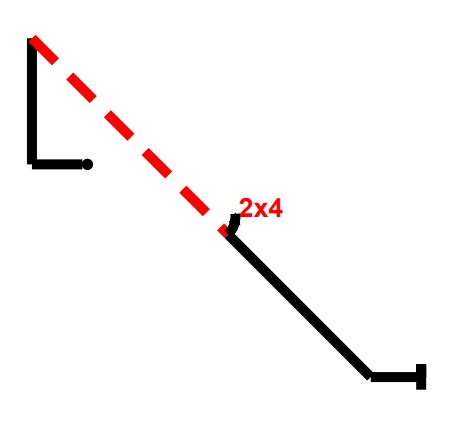
When we say ‘Wedge’ we mean when the up line comes first followed by the 45 degree downline. A Reverse Wedge would be just like a Reverse Half Cuban, where the 45 degree up line is flown first followed by the vertical down line.
Remember, in Aresti language any maneuver starts with a dot. The maneuver ends with a vertical cap line for figures that exit on the X – axis of the box. It ends with a horizontal cap line for figures that exit on the Y – axis. Look closely at the figure for the start dot and the end cap to know which way to fly the figure. Don’t do a Wedge when a Reverse Wedge is called for, or vice versa. Flying a maneuver backwards is a zero score. Also, the Aresti pictographic language is set to always have you fly into the arc, not against the arc, of the rolling segment arrow. (See Wedge figure above.)
The Up Line

The great Giles Henderson, 4 - time Sportsman National Champion and 4 – time Soucy Award winner, had difficulty with drawing an acceptable up line when flying the Wedge in his Clipped Wing Cub (See Giles article “13 Seconds” in the April 2007 issue of ‘Sport Aerobatics’).
Giles found that pulling to vertical, pausing for a split – second on the up line, and then flying the radius across the top (what he called “bump and pull” or “bump and go”) was not good enough. Some of the the judges kept writing “no line” on his scoring sheets. So Giles had to enter the maneuver faster and faster until he had enough energy for the judges to ‘see’ the up line. Higher speed aircraft don’t have as much trouble with this segment.
The 45 Degree down line, the Roll, and the Aresti judging standards
On the 45-degree line the roll must be centered. This roll must also be flown as a Slow Roll, even though Aresti language calls it an Aileron Roll. The coordinated Bob Hoover 1g Aileron Roll, or a zero g Primary Aileron Roll, do not exist in the Aresti language. By coordinated, I mean the ball in the inclinometer is centered during the roll.
A negative g push must be used initially to hold the line before the roll, followed by a ‘boot full’ of top rudder as the roll is driven toward the knife edge. The Slow Roll is NOT coordinated. These uncoordinated inputs are needed so that the Center of Gravity Track (CGT) of the aircrafts’ CG dot follows a straight 45 degree downline while performing the roll. That is the Aresti judging standard for all competition rolls.
If you do not have inverted fuel and oil capability your engine will be coughing and quitting during the roll.
For the line before and the line after the roll, however, the judging standard is the ZLA, or Zero Lift Axis of the wing. Not the flight path, and not the fuselage centerline. ZLA is approximately where the wing chord line is.
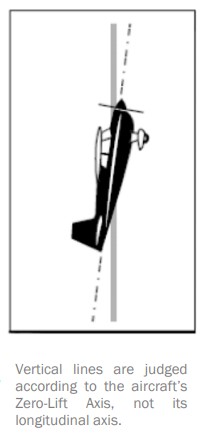
The Angle of Incidence is the angle between the fuselage centerline and the angle that the wing is bolted onto the aircraft. This Angle of Incidence will put the fuselage centerline off of the desired line when the wing Zero Lift Axis is at the correct angle. Fly the wing, not the fuselage, onto the vertical or 45 line.
The Decathlon has a high Angle of Incidence for its wing, for example. As a result the fuselage angle varies a lot from where its wing Zero Lift Angle is pointed. For example, if the Decathlon ZLA is perfectly set at 90 degrees to the horizon on a vertical up line the fuselage centerline should look slightly positive. The same slight positive fuselage angle should be seen on an up line in a ‘pot bellied’ Pitts Special if the ZLA is perfectly vertical. If the fuselage centerline is perpendicular to the horizon then the ZLA is slightly negative, which is a downgrade.
The ZLA of a symmetrical wing will be exactly where the chord line of the wing is. A regular asymmetrical wing’s chord line, like that on the Citabria for example, and the ZLA are not exactly the same. That airfoil shape must go to about a -3 degree AOA for zero lift, but it is pretty darn close to the chord line of the wing.
In vertical lines or 45 lines the ZLA must be either vertical or at 45 degrees to the horizon and NOT wind corrected. That way consistent judging of many flights can be applied in spite of changing weather conditions. For example, an aircraft who’s ZLA is perpendicular to the horizon on a vertical up line, while its flight path is being blown downwind, will receive a perfect score of 10.
45 Downline Accuracy
As for being accurate on the 45-degree downline there are a few methods to use. Newer people tend be shallow on these 45 lines. They also tend to bobble the radius across the top as they move their view back and forth between front and side references.
When you’re new it is also easy to get vertigo moving the head rapidly from in front to the wingtip, so be careful.
Many pilots use a sight gage mounted on or close to the wingtip to set a good 45 line. Some use the wingtip if no sight gauge is available. As you fly through the maneuver you will be required to move your head 90 degrees at least twice. Practice this so you can move your head and change your view without a bobble in the airplane. You want to pull to vertical, hold the up line, finish the arc across the top, and begin your 45 downline smoothly and seamlessly.
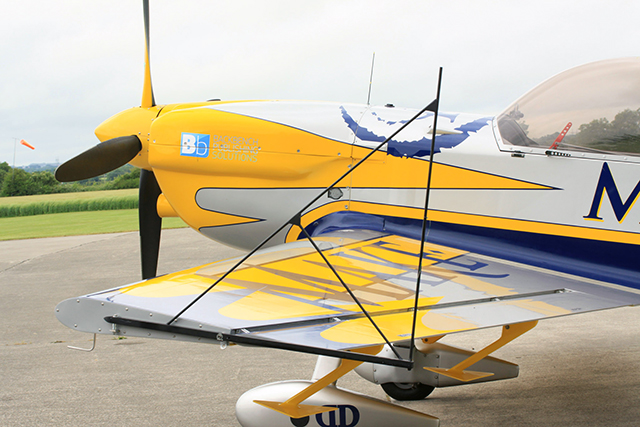
With the sight gauge, imagine you are aiming a gun. For aiming a gun, you must possess a back sight, a front sight, and the target. In this example a landmark miles away on the horizon is the target. The sight gage is the front sight, and your skull is the rear sight. Line them all up. The target should be in focus and the front sight slightly fuzzy. Use John Morrissey’s ‘Deep Focus’ and look all the way to the target on the horizon and fly the sight gage to it. Don’t just stare at the ‘front sight.’
Be absolutely hardcore and persnickety about seating position. Since your eye socket is the back sight of your ‘gun,’ you want your eye position in both height and fore/aft location to be the same for every flight.
Using sighting marks on the side of the canopy tends to be inaccurate. The marks are too close to your eye. Imagine the front and rear sights of a gun being located within an inch of each other. It is the same thing with canopy lines, giving less accuracy. A long rifle is more accurate than a snub-nosed revolver, isn’t it?
If no sight gage is installed, using the left wingtip angle against the horizon will work, but will require some ground coaching to get the angle right. The wingtip is now your ‘front sight.’
There is only one problem with the wingtip method. Unlike a sight gauge, the wingtip may not be exactly in your eye line. You may have to place the wingtip, or your ‘front sight,’ next to your horizon target instead of upon it. Ground coaching will help with this. You don’t want to have one wingtip lower than the other.
Once the down angle is set look straight ahead to the ground. Pick a blade of grass on the ground using John Morrissey’s “Deep Focus.” Hold that target in sight through the first line, throughout the roll, and through the line after. Draw Alan Cassidy’s and Eric Mueller’s ‘Sacred Circle’ around that point as you roll.
Trim
Don’t let the trim force pitch you up off of the 45-degree line after the roll as your speed builds up.
Better yet, have the trim set close to that needed for zero g, or at least for a speed that is 10mph faster than that used by your airplane for the Immelmann. This will help you maintain level flight between maneuvers easier and will make your vertical down lines easier to hold.
This trim setting will also help you fly your inverted portions with less push force needed.
We recommend that you set the trim before you start an aerobatic sequence, and then don’t change throughout. That way the pull and push forces necessary to enter a maneuver at the normal entry speeds will always be the same, building muscle memory.
(See the September 2020 Sport Aerobatics article "Aerobatics Trim" and October 2020 In the Loop electronic magazine article "Aerobatic Trim 2" for the 2-part articles on setting aerobatic trim.)
Centering the Roll
As for centering the roll, the roll must be centered on the line in distance. But you are accelerating the whole time you are on the down line, making the timing difficult. Initially, make the line before and the line after the roll roughly equal in time. Judge perception will usually see equal time as an equal distance flown. It is not perfect, but it is a place to start.
You’ll need to spend a slightly longer time on the slower line before the roll than on the faster line after the roll to make them equal in distance. The timing difference is small, however, and is not as great as a 2 for 1 ratio. It is closer to a 3 to 2 ratio.
In a Citabria or a Decathlon – type aircraft I would suggest maybe using “one potato, two potato” before the roll (on the slow portion) then “one potato – and” after the roll (the faster portion). If holding a longer down line it can be first ‘3 potatoes’ then ‘2 potatoes.’ This idea will get you close until you can get some ground coaching.
(For those of you that love math I present the following support for the approximate 3 to 2 ratios: 80 knots = 135 feet per second. 100 knots = 169 feet per second. 120 knots = 203 feet per second. 140 knots = 236 feet per second. 160 knots = 270 feet per second. 180 knots = 304 feet per second.
If the line before the roll averaged 100 knots, and the roll after the roll averaged 140 knots, a 2 second line before the roll would cover 338 feet. For the line after the roll to equal the same 338 feet at the faster speed, you would fly 1.43 seconds.)
Giles Henderson’s 45 Degree Method
Giles and others in the early days didn’t have sight gauges. Giles figured out a system and wrote a great article about using spots on the ground in front of you in the box to hold a good 45. Some of those elements will be covered below. It is not hard, but it does take some thinking. If you are new, you can skip to the next heading “Point Roll.” Come back when you feel you are ready for more.
(See June, 2011 issue of Sport Aerobatics, “Half Cubans, Accurate 45-degree Downlines.”). Giles way uses simple math to pick his ground target straight ahead while accurately holding a 45 degree line.
Here is a big picture of his proposal:
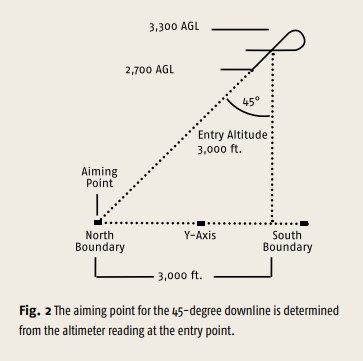
A right triangle, or 90-degree triangle, has two equal legs and 45-degree line between the two legs. The box is 3300’ wide. Let’s say a pilot was going to do a Half Cuban 8 or a Wedge. Let’s further say that the pilot is at 3000’ AGL when at the top of the Wedge.
Again, this right triangle must have two equal legs for the line between them to be 45 degrees. The pilot is now 3000’ above the ground and 300’ inside one edge of the box. If they aimed at the ground at the far edge of the box they would be shooting for a point 3000’ from a spot underneath their aircraft.
There you have your two equal length legs. This method works at any height, but takes some mental practice.
Giles continues. “As we relax back pressure and float over the top our vision has moved to look out the skylight. As the horizon comes into view we make any small aileron and rudder corrections needed to maintain the exact maneuver and more important, we locate our aiming point (the far boundary of the box).”
“Our vision remains fixed on this point as the nose continues its arc. We stop the pitch change with the nose dead on our aiming point with such authority that the aircraft almost quivers on the 45-line.”
“It is instructive to realize that the precision in locating the aiming point is quite liberal. In the above example we could point at the target 400 feet (1/8th of the box length) beyond the correct aiming point and our down angle would only be affected by 3.5 degrees (ARCTAN [3400]/[3000] – 45). If you now carefully maintain this angle/line, you are in fact flying with very good precision, but not with exact accuracy. However, it now becomes the burden of the judge to distinguish precision from accuracy and to distinguish 48.5 degrees from 45 degrees.”
“If after setting the line you recognize an error in the location of the aiming point, you DO NOT want to correct the pitch angle—not even during the roll where you can sometimes hide the correction, since this gesture is a sure confession of your sin.”
Point Rolls
If the half roll is also a point roll, a 2 of 4 or a 4 of 8, the points in the roll must be held long enough for the judges to see them.
One recommendation is to pause as long at the point as it took to roll to that point. The pauses and rolling rates also need to be the same to each point. The slower rolling aircraft will have to pause longer, or the judges may not see them.
On the 45 degree down lines pick that spot on the ground for your “Deep Focus” and do your “Sacred Circle” around that target.
Allow for the greater altitude loss that will occur on your 45 downlines as you hold those points.
Summary
There you have it. For those of you that are new, don’t be intimidated. Do it all in steps.
First, with instruction just get so you can do the maneuver completely and safely, even if it is somewhat rough.
Then, concentrate on where you are looking and when. Looking at the right place at the right time will make the maneuver easier, and will allow you to make changes correctly and accurately.
Second, get some ground coaching so you can quickly get mistakes spotted and corrected. The ground doesn’t have to be a pilot. Do this early, even if you are never going to compete. You don’t want to practice a mistake over and over, burning it incorrectly into your ‘hard drive.’
I would also define how far you want to go. This article is written for those who wish to practice recreational aerobatics as well as those that want to compete. Even though there are many competition points in here, recreational aerobats will find what they need in here.
But I must stress that even our non-competitors need to understand the Aresti standards. If they then need to modify the maneuver for any reason, like flying a non-inverted capable airplane, they know what standard they are modifying it from.
For you competitors, look at your judging sheets for the comments. Judges are not all the same so there may be some variability in observations.
Concerning the 45 degree lines, whether up or down, we have a recommendation from coaches and experienced judges. If half of the comments say ‘shallow’ and half say ‘steep,’ make your lines a hair steeper. That will get rid of half of the downgrade comments. Besides, newer people tend to go a bit shallow anyway.
I always recommend flying a Freestyle sequence, even if your just borrowing someone else’s. A Freestyle is allowed to dispense with the Loop. Many airplanes like angles and lines better.
The Wedge is a fun, high energy maneuver.
So practice, practice, practice. Stay hydrated. Take your parachute. Fly high.
Don’t forget to have fun.
Fly Safe!
Articles in the "2023 Sportsman Sequence" Series
Flying the 2023 Sportsman Sequence by Gordon Penner, In the Loop January 2023
Flying the Wedge by Gordon Penner, In the Loop February 2023
Flying the Immelman, by Gordon Penner, In the Loop March 2023
Flying the Loop, by Gordon Penner, Sport Aerobatics December 2019
Flying the Half Cuban, by Gordon Penner, In the Loop May 2023
Flying the Humpty Bump, by Gordon Penner, In the Loop June 2023
Flying the Competition Roll, by Gordon Penner, In the Loop July 2023
Flying the Hammerhead, by Gordon Penner, In the Loop August 2023
Flying the Spin, by Gordon Penner, In the Loop September 2023
Flying the Aerobatic Turn, by Gordon Penner, In the Loop October 2023
Online Resources:
Introduction to Aresti, by Brian Howard, www.iac.org/aerobatic-figures
More articles on typical Sportsman category figures
Half Cubans, Accurate 45-degree downlines, by Giles Henderson, Sport Aerobatics June 2011, pg. 28
Aerobatic Trim Part 1, by Gordon Penner, Sport Aerobatics September 2020
Aerobatic Trim Part 2, by Gordon Penner, In the Loop October 2020