Flying the 2023 Sportsman Sequence - Part 5 – Flying the Half Cuban Eight

Overview
The half-Cuban-eight is a wonderful recreational aerobatic maneuver and a good-looking competition maneuver. It is relatively easy to fly. Hidden dangers, however, lie in wait for the recreational aerobat in this maneuver.
The problem for recreational pilots is that almost all written information about aerobatic maneuvers is written against the international Aresti competition standard. What must be stressed here is that the Aresti standard assumes all airplanes involved have inverted fuel and oil systems, as well as negative-g structural capability. If airplanes without inverted systems, try to fly this maneuver without going into the negative-g area they can quickly get into a dangerous situation. This is especially true for newer, low-drag experimental aircraft.
In this article, which is geared toward newer aerobatic pilots, we will first talk about the maneuver as it is to be flown by the worldwide Aresti competition standards. 
Then, once we have the standard set, we will cover how to safely modify the half-Cuban-eight from that standard for those airplanes that don’t have inverted fuel and oil systems.
For those of you that have already been flying this maneuver, you can jump down to the section at end labeled “Modified Recreational Half-Cuban-Eight.” I still recommend that you go back, however, to read about the Aresti standard for this maneuver. There are some good flight techniques from experienced pilots in there as well.
Some pilots don’t want to recreationally perform negative-g flight anyway, even if the airplane does possess that capability. They may want to “baby” their hand-built airplanes. Many also want to give a good passenger ride.
Knowledge of the Aresti competition aerobatic standards is a good idea for pilots who will never, ever compete. Correct modification for safe recreational aerobatics is uncertain unless it is done from the fixed Aresti standard or baseline.
Remember, it takes more skill to fly an airplane with more restrictive limitations. That reality is what Bob Hoover and Tex Johnston were demonstrating in their YouTube videos. Are we recommending performing aerobatics in aircraft not designed and certified for them like they do? Certainly not. However, Bob and Tex demonstrate what can be done with the right knowledge and the right practice. They are an inspiration, but they’ve both regularly cautioned others not to do what they do without instruction, extensive practice, and enough altitude.
All of you, especially those of you who fly experimentals, must dig into your aircraft manuals for approved maneuvers, speeds, and limitations. 

For those of you flying slick experimentals, we also don’t recommend learning aerobatics in those airplanes. It is suggested you learn basic aerobatics in a high-drag, purpose-built trainer such as a Decathlon or Citabria, and then get type-specific aerobatic training in your model afterward.
Also, wear your parachute and please, please, please fly high.
Half-Cuban-Eight Aresti Competition Standard
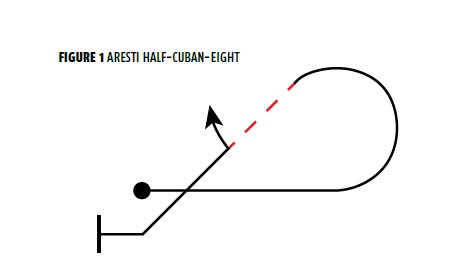
As seen in the Aresti symbol above (FIG. 1), the half-Cuban-eight starts with a pull-up into 5/8 of a loop, followed by a 45-degree downline, inverted, with a half slow roll to upright. After the slow roll is over, the 45-degree downline is continued, followed by a pull to level flight.
All maneuvers must begin and end with a segment of level flight, but the entry and exit altitudes do not have to match. Also, the radii (plural is ray-dee-eye, not radius-uzz) of the 5/8 loop and the part loop done when pulling from the 45-degree downline to level flight do not have to match.
This maneuver has three elements that must be conquered:
- First - You must make the 5/8 of a loop a constant radius without pinching the top.
- Second - Those darn 45’s and,
- Third - Centering the roll.
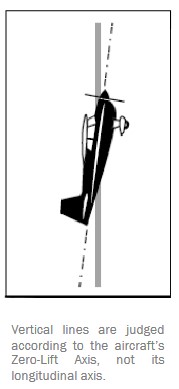
As spelled out in the IAC Official Contest Rules book,which conforms to the international standards, the vertical and 45-degree lines are judged on ZLA, or zero-lift axis. ZLA means the wings’ attitude against the horizon when the wing is making zero lift. In a symmetrical airfoil the ZLA will be where the chord line is. In an asymmetrical airfoil the ZLA will be within 3 – 4 degrees of the chord line.
The judges are looking for the ZLA in relation to the horizon to be at 45 degrees or 90 degrees without wind correction, not the flight path. It means that the flight path angle to the horizon with a 45-degree ZLA will be shallow in a tailwind and steep into a headwind for no demerits.
The ZLA is not where the fuselage centerline is. The Angle of Incidence is the angle that the wing chord line is mounted in relation to the fuselage centerline. If the ZLA of a Decathlon is perfectly vertical, for example, the fuselage angle will be a few degrees positive.
Looping segments and rolls are judged differently. They are judged by the CGT, or center of gravity track. CGT means that first we reduce the aircraft to a dot at the center of gravity, and then we look at the flight path of that CG dot.
Think of level flight. When slow the aircraft would be nose up, and when fast the aircraft would be nose down. If the CGT was level in both cases there would be no downgrades. Judging by CGT also resolves the differences between aircraft.
In the rolls, the CG dot must make a straight line while rolling, which means the pilot must use slow roll techniques. An arcing flight path while rolling would be a downgrade. More on that later.
The loop’s CGT must also be wind corrected. Make corrections when flying into the wind or downwind to keep the loop round.
I wholly endorse the statement made by the late, great Sportsman champion Giles Henderson: “Energy management is something the pilot does with the right hand, not the left.” Bob Hoover definitely shows deft energy management! Developed in the ’50s and ’60s, the Aresti system endeavors to discern and reward pilot ability, not horsepower, hence the ZLA and CGT standards.
First, I need to quickly review the elements of a loop.
(First) 5/8 Loop
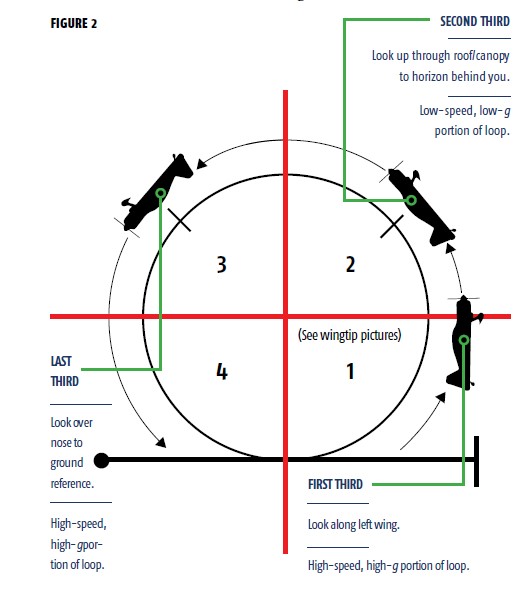
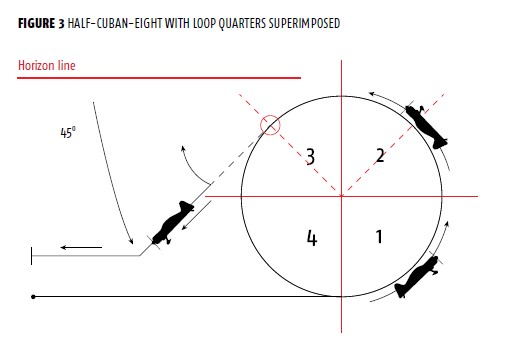
Even though we fly the loop in thirds, we must analyze it in quarters. (FIG. 2 and FIG.3)
The half-Cuban-eight is started just like the regular loop. Many people do not take enough care of this detail. (See the December 2019 Sport Aerobatics article “Looping the Loop.”) All quarters of the loop must have the same radius. In other words, it must be perfectly round with no bulges or flat spots. In this maneuver, you are just leaving the loop in the middle of quarter number three to do the 45-degree downline.
As in the full loop, the first rule is to have at least the minimum looping speed for your aircraft (or more). Second, you must pull enough g into quarter number one to make it small. 3g minimum will be required, 3.5g to 4g would be better, which most new pilots are not used to.
Average-horsepower aircraft do not have enough thrust to get around a bigger loop, so they run out of “Schlitz” or “smash” (energy) prior to reaching the top. It is counterintuitive, but pulling harder g to keep the looping portion small will give the aircraft more energy over the top.
If you pull less g and make a bigger loop, mistakenly thinking you are being easier on the airplane, you could run out of energy on top. In this case, you would fail to get over the top of the loop and fall into a spin, a whip stall, or a tailslide. Most experimental aircraft and some standard aircraft such as the Decathlon are not built for whip stalls or tailslides. Aircraft damage will result.
The judging standard with any loops or part loops is that quarter number one is free to the pilot. The radius drawn by the pilot in quarter number one must then be duplicated in quarters two, three, and four. Drawing a constant radius prevents the top of the looping segment from being “pinched,” which means the top of the loop has a tighter, smaller radius than quarter number one. 
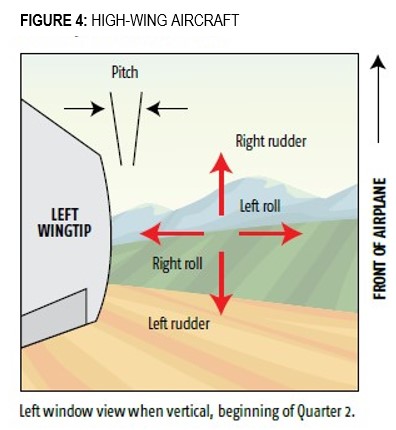
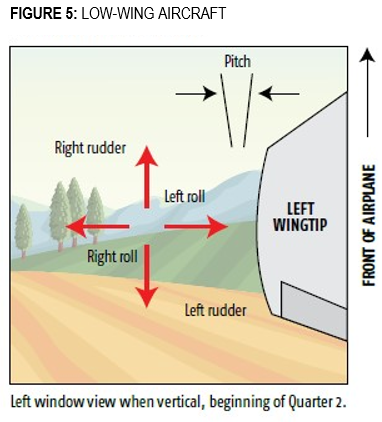
The following left wingtip images (FIG. 4 and FIG. 5) show what the pilot should see when going vertical at the beginning of quarter number two in the loop for both high wing and low wing aircraft. Most of the first half of the loop is flown by the wingtip reference. (FIG. 2.) Many new people have not flown the aircraft using a wingtip reference instead of a tip-of-the-nose reference. Pitch, roll, and yaw at the wingtip are shown in the illustrations.
For training and practice, try doing a stall approach, stall break, and stall recovery using only a left wingtip reference. Not letting the wingtip move forward or aft (yaw) in relation to a spot on the horizon off the left wingtip, and not letting the wingtip move up or down from the horizon (roll) will keep the wings level and the ball in the center throughout the maneuver.
(second) 45 Degree Line
Flying the 45-degree lines well depends a lot on the pilot’s eye position and ground coaching.
Whatever sighting system is used, whether it is a sight gauge or some part of the aircraft structure (left wingtip), it is important that the pilot be absolutely fastidious about seating position. Always sit so that the eye position and its relation to the sighting system or airplane structure are the same for every flight.
Also, when it comes to 45-degree lines, most new people are shallow. There is also a perception problem for the pilot. A correct 45 downline looks WAY steeper over the nose from the cockpit. Getting ground coaching would be best, but if you can’t get it, being a little steep is better than being a little shallow.
For more detail, if you wish see Giles Henderson’s 45-degree method below click HERE. If not, move onto the next section.
(third) The Slow Roll, and Centering the Roll
Again, your CGT must maintain the same line during the roll. What does that mean?
First, on the 45-degree downline, which you are flying inverted, you must push hard enough to hold your ZLA attitude constant at 45 degrees down. That requires almost -1g.
Notice that in the above Aresti symbol, the 45-degree downline before the roll is a dashed line, not a solid line. Dashed lines indicate negatively loaded flight. That means the blood is rushing to the pilot’s head instead of the pilot’s feet. Inverted fuel and oil systems will be needed here to keep the engine running and lubricated.
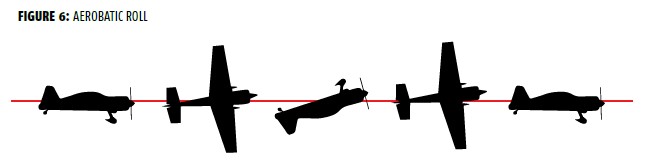
Next, you must make a good slow roll to upright. It might be called the aileron roll in Aresti language, but don’t be confused. The ballistic 0g aileron roll or 1g Bob Hoover–style aileron roll doesn’t exist in Aresti, and neither does the Barrel Roll. In Aresti, the roll is required to be flown as a slow roll. See the following diagram of a slow roll. Just angle the roll centerline down 45 degrees. Since you are only doing a half-roll from inverted to upright, not a full roll, you’ll be flying the last three airplane images.
The airplane CGT must make a straight line, 45 degrees down from the horizon, while the airplane is rolling. There must be no arc in the flight path as the aircraft is rolling. Also, unlike the ballistic 0g or +1g aileron rolls, the slow roll is not coordinated except at the beginning.
The pilot starts the roll from inverted to upright with coordinated rudder, which means a rudder input opposite the aileron movement. Remember, opposite rudder is coordinated rudder when holding negative g.
Once the aircraft rolls about 45 degrees, the pilot will then shift their feet from coordinated rudder to the “top” or “sky” rudder. Now the pilot is no longer coordinated and is falling to the low side of the aircraft. The purpose of this step is to keep the CG dot making that straight line. You’re holding the nose up to the sky with the “sky” rudder and not sagging to the ground while in knife-edge flight. Once the roll is finished, the airplane must be set back to the 45-degree downline ZLA attitude in upright flight.
To the judges, the line must appear as one piece including the roll, with no sagging before, during, or after the roll. The roll must also appear centered on the full length of the line.
As for centering the roll, until you get good ground coaching, make the line before and the line after the roll equal in time. It is not perfect, but it is a place to start. With coaching, you will find that you’ll need to spend slightly longer on the slower line (before the roll) than the faster line (after the roll) to make them equal in distance, but the timing difference is not as great as a 2-to-1 ratio. More like 3 to 2.
In a Citabria or a Decathlon – type aircraft I would suggest maybe using “one potato, two potato” before the roll (on the slow portion) then “one potato – and” after the roll (the faster portion). If holding a longer down line it can be first ‘3 potatoes’, then ‘2 potatoes.’ This idea will get you close until you can get some ground coaching.
The line before the roll sets the standard, and you will either be “short after” the roll or “long after” if the roll doesn’t look centered.
The next 2 sections below are Sportsman Champion Giles Henderson’s math on flying accurate 45 lines and centering the roll. If you wish you can skip those two and jump down to the TRIM section.
Giles Henderson Math for Centering Roll
For those of you that love math I present Giles Henderson’s support for the approximate 3 to 2 ratios: 80 knots = 135 feet per second. 100 knots = 169 feet per second. 120 knots = 203 feet per second. 140 knots = 236 feet per second. 160 knots = 270 feet per second. 180 knots = 304 feet per second.
If the line before the roll averaged 100 knots, and the roll after the roll averaged 140 knots, a 2 second line before the roll would cover 338 feet. For the line after the roll to equal the same 338 feet at the faster speed, you would fly 1.43 seconds.
Giles Henderson’s 45 Degree Method
Giles and others in the early days didn’t have sight gauges. Giles figured out a system and wrote a great article about using spots on the ground in front of you in the box to hold a good 45. Some of those elements will be covered below. It is not hard, but it does take some thinking. 
Giles method uses simple math to pick his ground target straight ahead while accurately holding a 45-degree line.
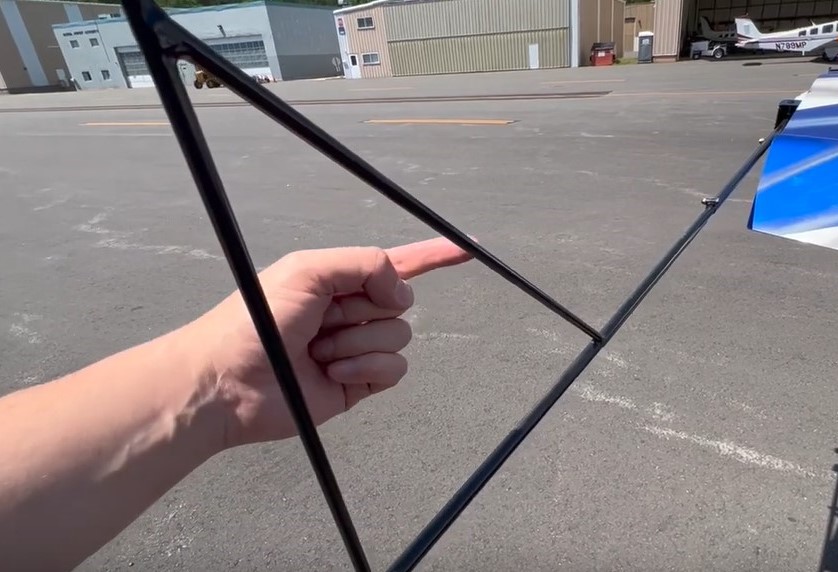
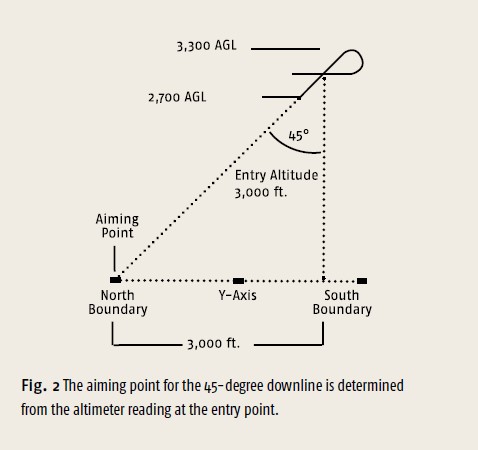
Here is a big picture of his proposal. (FIG. 2 right)
A right triangle, or 90-degree triangle, has two equal legs and 45-degree line between the two legs. The box is 3300’ wide. Let’s say a pilot was going to do a Half Cuban 8 or a Wedge. Let’s further say that the pilot is at 3000’ AGL when at the top of maneuver.
Again, this right triangle must have two equal legs for the line between them to be 45 degrees. The pilot is now 3000’ above the ground and 300’ inside one edge of the box. If they aimed at the ground at the far edge of the box, they would be shooting for a point 3000’ from a spot underneath their aircraft.
There you have your two equal length legs. This method works at any height but takes some mental practice. There is also a perception problem as the correct angle looks WAY steeper over the nose from the cockpit than from the ground.
Giles continues. “As we relax back pressure and float over the top our vision has moved to look out the skylight. As the horizon comes into view, we make any small aileron and rudder corrections needed to maintain the exact maneuver and more important, we locate our aiming point (the far boundary of the box).”
“Our vision remains fixed on this point as the nose continues its arc. We stop the pitch change with the nose dead on our aiming point with such authority that the aircraft almost quivers on the 45-line.”
“It is instructive to realize that the precision in locating the aiming point is quite liberal. In the above example we could point at the target 400 feet (1/8th of the box length) beyond the correct aiming point and our down angle would only be affected by 3.5 degrees (ARCTAN [3400]/ [3000] – 45). If you now carefully maintain this angle/line, you are in fact flying with very good precision, but not with exact accuracy. However, it now becomes the burden of the judge to distinguish precision from accuracy and to distinguish 48.5 degrees from 45 degrees.”
“If after setting the line you recognize an error in the location of the aiming point, you DO NOT want to correct the pitch angle—not even during the roll where you can sometimes hide the correction, since this gesture is a sure confession of your sin”.
Trim

Don’t let the trim force pitch you up off of the 45-degree line after the roll as your speed builds up.
Better yet, have the trim set close to that needed for zero g, or at least for a speed that is 10mph faster than that used by your airplane for the Immelmann. This will help you maintain level flight between maneuvers easier and will make your vertical down lines easier to hold.
This trim setting will also help you fly your inverted portions with less push force needed.
We recommend that you set the trim this way before you start an aerobatic sequence, and then don’t change throughout. That way the pull and push forces necessary to enter a maneuver at the normal entry speeds will always be the same, building muscle memory.
More detailed articles about setting trim for aerobatics:
In the Loop 2020 October Aerobatic Trim Part 2
Modified Recreational Half-Cuban-Eight
It is hard to believe that such a simple maneuver can cause such high heart rates, damaged airplanes, and soiled underclothing. When people in non-inverted capable aircraft with low experience modify this maneuver, they usually get it wrong. This occurrence leads to the dangerous situation I talked about in the beginning. The problem is worse in slick, modern experimental airplanes.
Here is how it happens. 
The pilots are trying to avoid negative-g flight, so they, correctly, move the half-roll from the middle of the 45-degree downline up to the beginning. It is good thinking. They further think that they will do the half-roll like Bob Hoover does, being coordinated all the way around and maintaining positive g on the aircraft. Also, good.
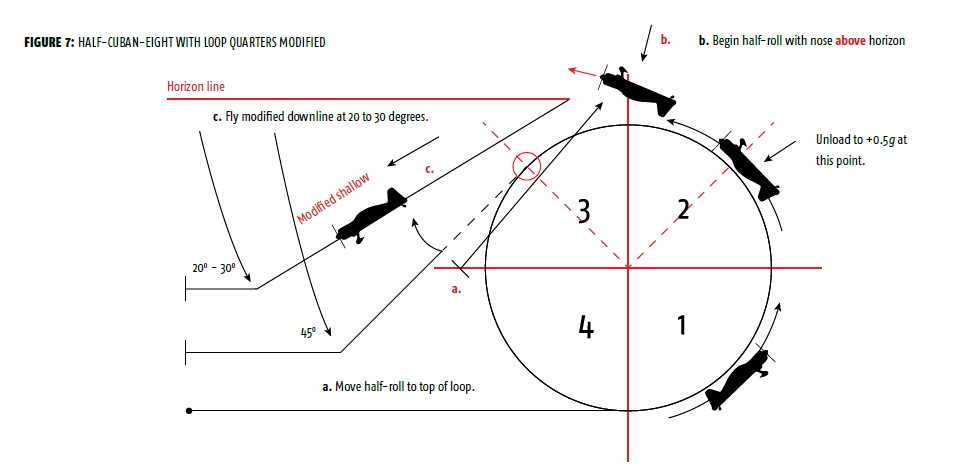
The problem is the planning and flying of the roll as described above coupled with flying the 45-degree downline. Even though the competition standard for the downline is 45 degrees, recreationally you don’t have to fly it that steep. Twenty to 30 degrees down would be better.
More important, the downline angle is what you want to see at the END of the roll, NOT the beginning.
If you are not doing full slow roll techniques, while you are maintaining positive g on the aircraft the nose is moving toward the ground the whole time you are rolling. The lift vector acts perpendicular up from the top of the wing, and you are now pointing that lift vector to the ground. You are literally pulling yourself down to the ground. The slower you’re rolling, the longer the nose is dropping.
The biggest single thing that gets people into an overspeed/over-g situation is that they are STARTING this positive-g roll with the nose BELOW the horizon.
Start this positive-g roll with the nose ON or ABOVE the horizon. I can’t stress this step enough.
By starting the roll with the nose below the horizon, the nose ends up WAY below the horizon when they finish. With the nose down so low, the airspeed needle is screaming around the airspeed dial, usually into that black part that comes above the airspeed redline.
What happens next is that they get scared and pull too hard to get back to level flight, over g-ing the aircraft.
When pilots are new to aerobatics, they have rarely seen all brown/green and no sky blue out of the forward windshield. Looking straight down is scary and disorienting. If they started the maneuver lower than they should have, the closeness of the ground will give them even more incentive to pull hard on the stick or yoke. Assuming the ground does not “intervene,” they usually have a damaged aircraft and soiled underclothing when they get back to level flight.
The maneuver starts out so benign, so it is amazing how fast it can go bad. 
Modern, slick experimental aircraft, where aerobatics are a “side dish” capability rather than the aircraft’s primary mission, get into this problem quicker due to their low drag. Their airspeed redlines may also be lower than purpose-built aerobatic aircraft. These aircraft are as bad as gliders in reaching overspeed quickly due to their low-drag quotients.
You can slow down how fast the nose of the aircraft approaches the ground by unloading slightly both before and during the roll. Easing forward on the elevator to where you are light in the seat can still have you and the aircraft at half of a positive g. You should feel light in the seat over the top of the loop, anyway. The fuel and oil will still feed, and the engine will still run. But you are not pulling toward the ground as hard when upside down.
Also, we don’t care if you pinch the top of the looping segment when flying recreationally. Spending less time at the upper, slow-speed portion of the loop is actually safer. Doing the looping segment like a good old-fashioned barnstormer’s loop (which is pinched at the top and is taller than it is wide) is okay and encouraged.
See the FIG.7 above right for recreational figure modification.
Summary
So that is how to correctly do the half-Cuban-eight, and how to SAFELY modify it for non-negative g aircraft. Please beware and take care, as we don’t want anyone to hurt themselves or their airplanes.
Don’t teach yourself aerobatics. Get a qualified instructor, watch your redlines, watch your altitudes, wear a parachute, and have fun!
Articles in the "2023 Sportsman Sequence" Series
Flying the 2023 Sportsman Sequence by Gordon Penner, In the Loop January 2023
Flying the Wedge by Gordon Penner, In the Loop February 2023
Flying the Immelman, by Gordon Penner, In the Loop March 2023
Flying the Loop, by Gordon Penner, Sport Aerobatics December 2019
Flying the Half Cuban, by Gordon Penner, In the Loop May 2023
Flying the Humpty Bump, by Gordon Penner, In the Loop June 2023
Flying the Competition Roll, by Gordon Penner, In the Loop July 2023
Flying the Hammerhead, by Gordon Penner, In the Loop August 2023
Flying the Spin, by Gordon Penner, In the Loop September 2023
Flying the Aerobatic Turn, by Gordon Penner, In the Loop October 2023
Online Resources:
Introduction to Aresti, by Brian Howard, www.iac.org/aerobatic-figures
More articles on typical Sportsman category figures
Half Cubans, Accurate 45-degree downlines, by Giles Henderson, Sport Aerobatics June 2011, pg. 28
Aerobatic Trim Part 1, by Gordon Penner, Sport Aerobatics September 2020
Aerobatic Trim Part 2, by Gordon Penner, In the Loop October 2020