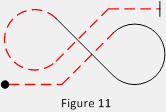
While Families 7 and 8 are the two largest families in the Catalogue, there are no new notations to learn. Every figure in these two families can be deciphered simply by starting at the dot, and observing the line style, the angle of any straight lines, and the amount of looping line used to construct each figure. Let’s look at Figure 11 from the Family 7 “Horizontal Super Eight” subfamily to see what I mean:

The beginning of the figure is shown by the start dot/circle. The initial line is dashed so we know the airplane is beginning this figure with a negative AoA, and since every figure begins on a horizontal line, the airplane must therefore be inverted. The first ‘corner’ is a push up to a 45° line. We know it’s a 45° line and not 30° or some other angle because straight lines can only be horizontal, 45°, and vertical. The inverted 45° line is now followed by an inside (positive AoA) 3/4 loop which terminates in another 45° line up. This time, however, the line style is solid, so we know the airplane is upright (positive AoA). That positive line is next followed by another 3/4 loop, but this time drawn as a dashed line. That tells us the loop is outside, or negative. The outside 3/4 loop ends in yet another inverted 45° line. Finally, the figure ends, as all figures do, on a horizontal line, though this one is dashed, or inverted. The vertical hash line tells us the figure is over at that point.
As odd as some of the figures in Families 7 and 8 first appear, you now know all the Aresti notations necessary to figure out exactly what the airplane should be doing at any point in any figure.
Up to this point we’ve been talking about the Aresti notations necessary to understand the flight path and attitude the airplane will follow when flying any of the basic figures found in Families 1 through 8. If you’ve been following along in your Aresti Aerobatic Catalogue, you have likely noticed that most figures have additional curved-line symbols located on the figure, this Family 8 figure being one example:
Much earlier we said that Family 9 consists of the rotational elements: aileron rolls, snap rolls, and spins, and that they must complement one of the basic figures. But it turns out you can’t just sprinkle rolls and spins on a figure anywhere you want. Once again, the Catalogue is our builder’s guide to exactly what we can and cannot do with the rotational elements on any given figure.
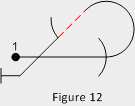
Looking at Figure 12 below, the first symbol we see, besides the figure itself, is a curved line passing completely through the horizontal entry line. This is the “optional roll” symbol and it simply means that when it comes time to construct a flyable figure, the designer of that figure has the option to: (1) do nothing and simply let the airplane enter the 5/8th loop without any rolling; or (2) has the option of putting one or two rolls at that location which in their total extent of rotation do not change the character of the line after the roll or rolls are complete.

Note that the line before the symbol is solid and the line after the symbol is also solid. That tells you the character of the line has not changed because of any rolling. The simplest example of how to achieve that would be to put a single, full roll at that point in the figure. The airplane would be upright before the roll and upright after the roll. But the same results could be had by putting in a double roll, two half rolls, a 1/4 plus 3/4 roll, and so forth. The symbol doesn’t tell us what kind of roll may go there, or that a roll must go there. It only says that it’s okay to put a roll there and if the designer chooses to add a roll at that point in the figure, it must not change the character of the line.
Continuing around the 5/8th loop of that same figure, we find ourselves inverted on a 45° degree down line. Now we encounter another curved-line symbol, but this one does not extend through the line, in fact it is one-half of the optional roll symbol. This time, however, the character of the line changes from dashed to solid following the symbol. This second symbol is the “mandatory 180° attitude change” notation. The only way for the airplane to go from a negative AoA to a positive AoA on the same line is for the attitude of the airplane to change by 180°. Therefore, when building this figure, it is mandatory that the designer put a roll or roll combination at this point which results in a 180° attitude change. Again, the simplest example would be a single half roll. However, a one and a half roll, or any combination of rolls, for example a 3/4 roll followed by an opposite direction 1/4 roll, would have the required result of changing the character of the line. I say again, there is no option for the figure builder to do nothing at this point. A roll or rolls must be added to the figure at the location of the symbol which results in a 180° attitude change.
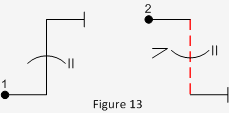
For the last two symbols we’ll discuss in this Part 1 of the tutorial, let’s go back and look at two figures from Family 1:

The symbol on example 13-1 looks a lot like our “optional roll” symbol we just discussed, except it has two vertical hash marks off to one end of the curved line. As you suspected, this is indeed telling you that when you build this particular figure you have the option of putting no roll at all on the figure, or you can put a roll or roll combination at that point. The difference in the two optional roll symbols, no hash marks versus the two vertical hash marks, is that contrary to the first optional roll symbol which required any rolls, if used, to have a total rotation of exactly either 360° or 720°, roll(s) placed here can have any total rotation ranging from 90° to 720°, in quarter roll increments. Why is that? Well, on a horizontal or 45° line the airplane has to end up wings level after the roll(s). On a vertical line, however, any rotation in one-quarter rotation multiples simply changes the exit direction and not the final attitude of the airplane. The corollary to that point is that the first optional roll symbol will only be found on horizontal and forty-five degree lines, and this symbol (example 13-1) will only be found on vertical, either up or down, lines.
So at last, we’ve arrived at the thirteenth letter of our Aresti alphabet. The symbol illustrated in Example 13-2 looks like the optional vertical roll symbol went out and picked up a friend in the form of two-sided triangle, or caret. Everything you’ve learned so far about the roll symbols stays true: this symbol indicates a roll may be put in this figure at this point, and the two hash lines tells us that if a roll or rolls are used, any amount of rotation from 90° to 720° is okay. But what’s up with that caret symbol on the opposite side of the curved line? That caret tells us that if the designer chooses, a spin may be added to this figure. This symbol then is the most flexible of all the optional roll symbols. It is really telling the person building any figure which includes this symbol that they have four options at the point on the figure where the symbol appears: Option (1), do nothing at all; Option (2), add a vertical roll(s); Option (3), add a spin; and Option (4), add a spin followed by a vertical roll. Of course, spins can only go down, so the only place you will find this symbol is on the vertical down lines of figures in Families 1 and 8.
We have spent the last many paragraphs learning what is and is not allowed when building a flyable figure from the parts available in the Aresti Catalogue. Continuing with this tutorial, we’ll take that knowledge, add seven more letters to the Aresti alphabet, and show you how to draw figures and put those figures together in a sequence that any aerobatic pilot in the world can look at and know exactly what you intended when you drew it.

