Previously in this tutorial we’ve talked about the Catalogue’s ‘drawing conventions.’ For instance, one drawing convention you learned was that all looping lines less than 180° are drawn as hard angles. Representing flight on the Y axis is another drawing convention and it borrows from the craft of drafting (now known as CAD for those of you too young to remember triangles and French curves), which also had to find a way to represent three dimensional objects on a two dimensional sheet of paper. For aerobatic figures, any entry line and/or exit line which is to be flown on the Y axis is drawn as an isometric line (i.e., a line at a 30° angle to the horizontal). Additionally, for exit lines on the Y axis, the cross-line indicating the end of the figure is drawn horizontally rather than vertically, as it is for figures ending on the X axis. As usual, a few examples are worth many words:
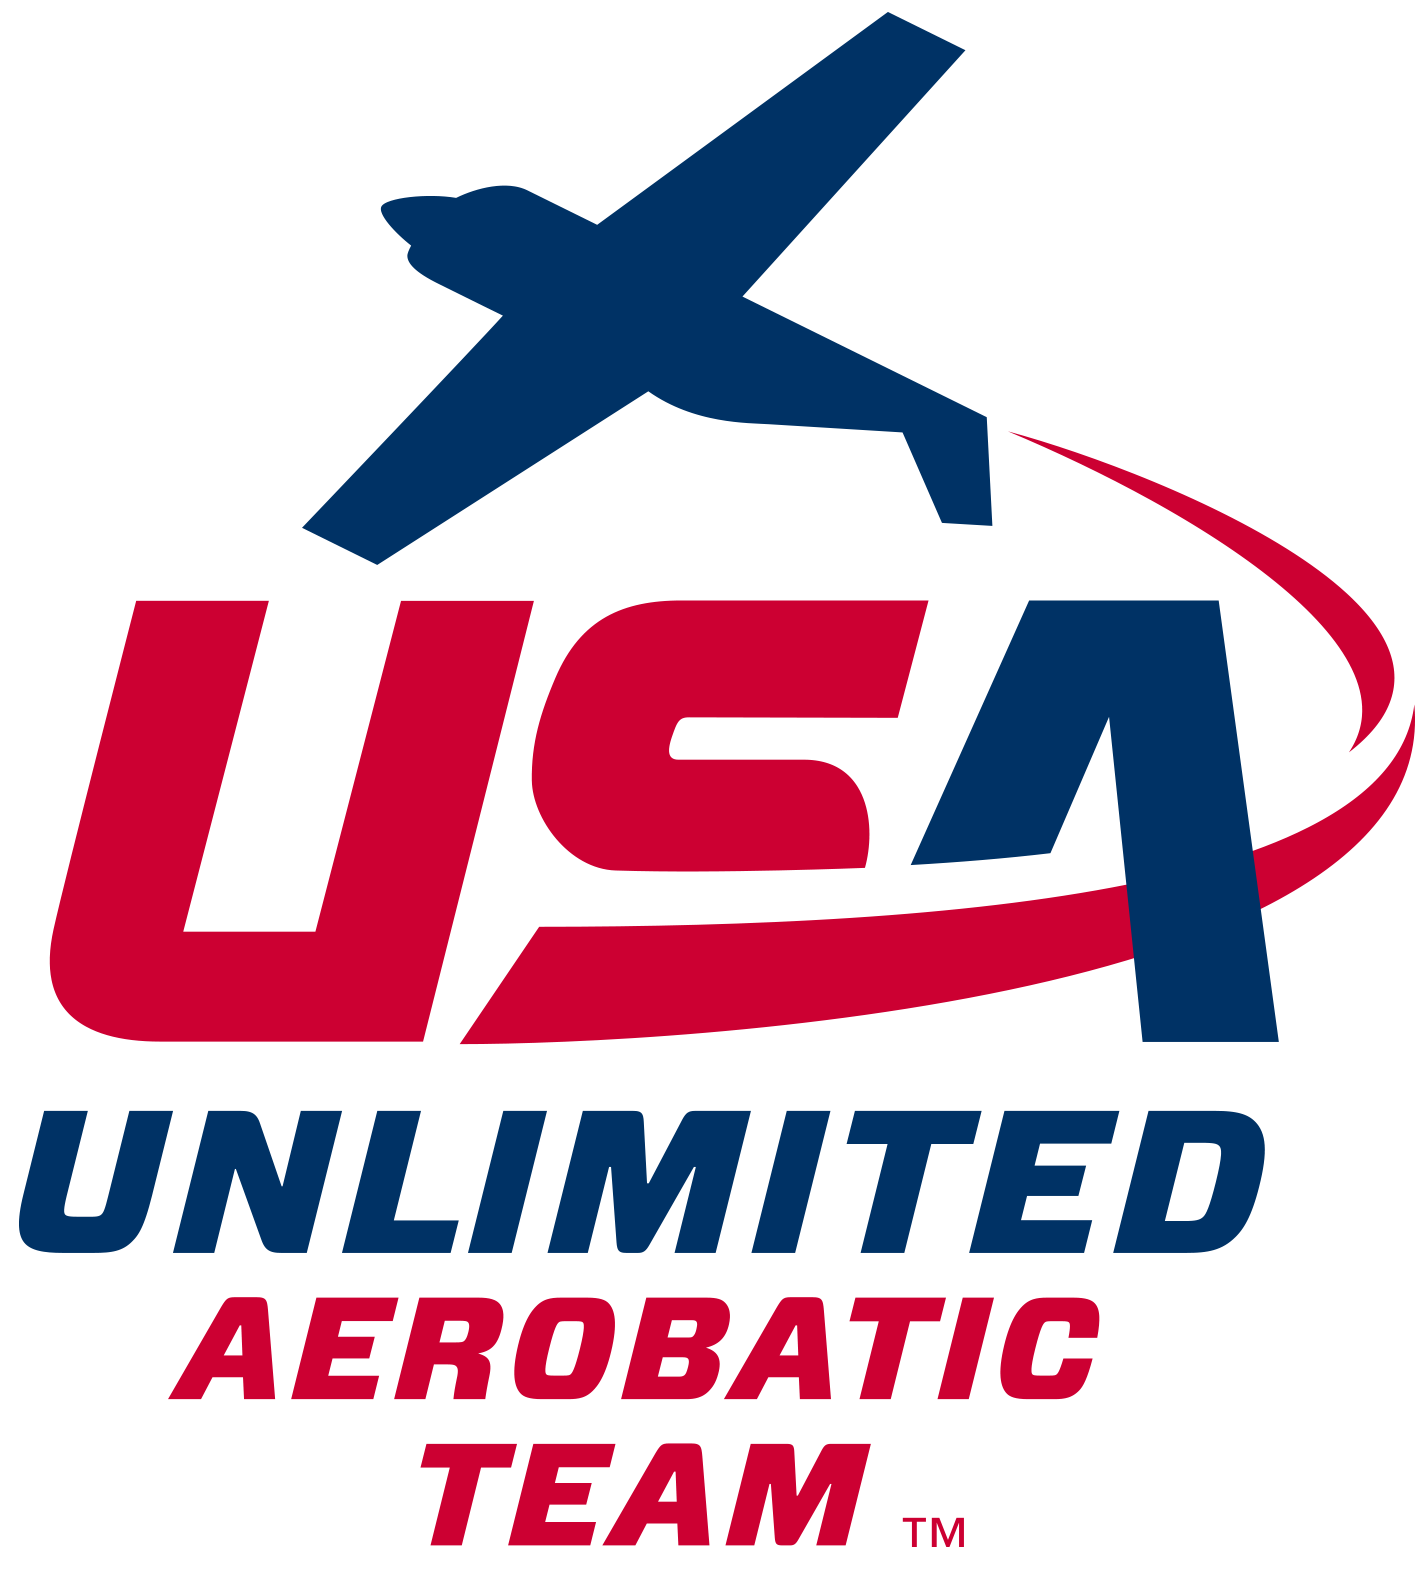
Example 10-1 is the same 1.2.3.1 figure we’ve been working with, but now with a 1/4 roll on the vertical down line. This results in an exit onto the Y axis. Note the 30-degree exit line and the horizontal cross-line. Example 10-2 is a 1 1/4 upright spin entered from the Y axis and exiting to the judges’ left on the X axis. Now the entry line is drawn as an isometric (30-degree) line, but the exit line is horizontal and the cross-line is vertical indicating an X axis exit. Finally, Example 10-3 is a 1/4 slow roll on the vertical up line entered flying left to right on the X axis and exiting on the Y axis. How do we know those are Y axis exit on 10-1 and 10-3 and a Y axis entry on 10-2 and not diving or climbing lines? First, the drawing convention we just defined, and second, because every figure must begin and end on a horizontal line.
I’ve been very unambiguous about stating the direction of flight on the X axis based on how a figure is drawn, but what do we know about the direction of flight on the Y axis? Not much really. The direction the pilot flies on the Y axis is the pilot’s option and will be determined by wind, strategy, box position, and the previous figure in the sequence. In fact, when we draw a figure with either a Y axis entry or exit, we have no way of mandating the direction (away from or toward the judges) the pilot must fly. How a figure’s Y axis entry or exit is drawn is more often the result of drawing layout concerns than anything else. To illustrate that point, take a look at the following eight figures:
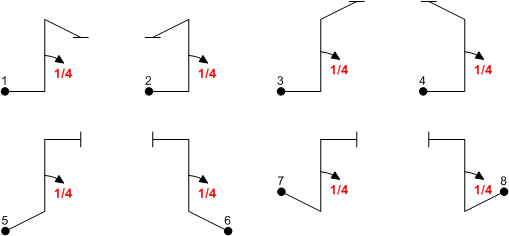
They may each look very different, but every one of those eight figures is the identical 1.1.6.1 with a 1/4 vertical slow roll. Examples 11-1 through 11-4 all begin on the X axis flying left to right and end on the Y axis. Examples 11-5 through 11-8 all begin on the Y axis and end on the X axis, with 11-5 and 11-7 exiting left to right and 11-6 and 11-8 exiting right to left. None of those drawings indicate, before the sequence is flown, which direction the pilot will choose to fly the Y axis entries or exits.
All of the example drawings I’ve shown you up to this point use single rotational elements ranging from 1/4 to two full rotations. Aerobatic rules, however, allow a maximum of two rolls, or one spin and one roll, on any given line segment within a figure. The symbology doesn’t change, but there are rules for how multiple (i.e., two) rotations may be combined.
The first rule which must be remembered when constructing a figure with multiple rolls, is that there can never be more than two rotational elements on any one line segment. The second, somewhat more difficult to understand rule is, “Two rolls of the same type may never rotate in the same direction.” All fine and dandy except you are asking, “What’s a roll ‘type’?” and what about the fact that I have never mentioned anything about a rotational element’s direction of rotation? To understand, let’s break that rule into two pieces, taking “Two rolls of the same type,” first.
We’ve talked about slow rolls, hesitation rolls, inside snap rolls, outside snap rolls, upright spins and inverted spins. However, those six different elements can be combined into just three types: (1) slow and hesitation rolls are both aileron rolls; inside and outside snap rolls are both snap rolls; and upright and inverted spins are both spins. So there are your three types: aileron rolls, snap rolls, and spins.
The second part of that rule states, “…may never rotate in the same direction.” The direction of rotation for any single roll is always pilot’s choice. You cannot tell from the drawing of a figure which way a pilot will choose to rotate any single roll until that figure is flown. To be sure, when flying a sequence, or a figure with more than one single roll, the direction of any specific roll may be set by the direction the pilot has to exit the figure, but there were still pilot choices somewhere along the line which set the necessary direction of rotation. There is no way when drawing a figure to require that the pilot roll or spin right or roll or spin left.
Through the use of the roll notation you’ve already learned, however, we can indicate the direction of the second roll relative (same direction or opposite direction) to the first rotational element when drawing multiple rolls on a line segment. Take the four examples in Figure 12:

In each of these four examples, you have no idea which way the pilot will rotate the first element, but you do know from the drawing which way the second element must rotate relative to the first. In Example 12-1, note that the arrowheads of the two slow rolls are drawn on opposite sides of the line segment. That signifies the second roll must rotate in the opposite direction to whichever way the pilot chose to roll on the first element. Example 12-2 also shows opposite direction rolls, but now we use the fact that the arrowhead of the slow roll and the flag on the snap roll triangle are on opposite sides of the line. Examples 12-3 and 12-4 show rotational elements that must be rotated in the same direction because the flag and arrowhead are drawn on the same side of the line segment. In 12-3 the pilot may snap in either direction, but must then do a full slow roll in the same direction. Same with the spin and roll combination in Example 12-4. Drawing convention: If the aileron roll arrowheads or snap/spin flags are drawn on the same side of the line segment, the two elements must rotate in the same direction. If the aileron roll arrowheads or snap/spin flags are drawn on opposite sides of the line segment, the two elements must rotate in the opposite direction.
Now that we know how to draw two rotating elements such that the relative direction of rotation is indicated, we can draw roll combinations that are legal as illustrated in Figure 13.

Example 13-1 depicts a full slow roll is followed by a “2 of 4” hesitation roll in the same direction. One is a slow roll and the other a hesitation roll, but they are both the same type: aileron rolls. Therefore, according to our rule they are not allowed to rotate in the same direction and this would be an illegal figure. Example 13-2 shows the same two rolls drawn in opposite direction which now complies with the rule and makes it a legal figure. Example 13-3 is an inside full snap followed by an outside full snap in the same direction. Though one snap roll is inside and the other outside, they are both the same type: snap roll. The rule applies and to make that figure legal, they would have to be rotated in the opposite direction as depicted in Example 13-4.
A spin may only be followed by a roll (not another spin), so any roll following a spin is by necessity a different “type.” Therefore any roll following a spin can be drawn to rotate in either the same or opposite direction, just depending on how the person drawing the figure wants it to happen.