Part 5 - Botched go-arounds
By Gordon Penner, FAA Gold Seal Instructor, 3-time MCFI-Aerobatic, FAASTeam Representative, B767 Capt., SAFE Bronze Member
“The assumption that an aborted landing is invariably the consequence of a poor approach, which in turn is due to insufficient experience or skill, is a fallacy.” – FAA Airplane Flying Handbook
“The go-around maneuver is not inherently dangerous in itself. It becomes dangerous only when delayed unduly or executed improperly.” – FAA Airplane Flying Handbook
Like Rodney Dangerfield, the go-around doesn’t get the respect it deserves
Introduction and Overview
Those statements above effectively hammer the points covered in Part 5 of preventing Loss of Control – Inflight, or LOC-I accidents. In this part we are here to delve deeply into the crashes that occur after a mis-managed go around. First, we need to convince pilots to go around, and then to begin their go arounds’ sooner. Second, it is a terrible thing to have the pilot make a life-saving decision to go around, only to lose control of the aircraft while doing so.
The deceptively ‘simple’ go around is not so simple, and most pilots do not practice it very often. Like Rodney Dangerfield, the go around doesn’t get the respect it deserves. So, let’s talk about how a go around should be done, when it should be done, as well as cases of how it can go horribly wrong.
As I’ve said before, your big picture view of a thing, or your ‘strategic vision,’ is as important as the steps of how to do that thing. The big picture view includes understanding, not just procedures. As Master CFI Greg Koontz, among others, has said, steps and procedures without understanding included is one of the biggest problems with our training today. I wholeheartedly agree.
For those of you just tuning in, the FAA, Emergency Maneuver Training (EMT) guru Rich Stowell, the AOPA Air Safety Foundation, and other interested parties are trying to reduce the LOC-I accidents because they are the leading cause of fatal accidents in General Aviation. They are finding that pilots are not only lacking stick and rudder skills, they are also making bad decisions and not compensating for distractions.
Overcoming these problems is what this series of articles is about. Welcome if this is your first view of this series. I hope you’ll go back and view the other parts, join in the ‘conversation,’ and become part of the safety culture.
The data and illustrations for this article are from Rich Stowell’s Emergency Maneuver Training manual, his seminars and books, NTSB, FAA, and AOPA Safety Foundation accident reports, the FAA’s Pilots Handbook of Aeronautical Knowledge (PHAK), Airplane Flying Handbook (AFH), the Aviation Instructors Handbook, and the FAA Safety Briefing Magazine, Mar/Apr 2012. I have also gleaned some good information from the accident prevention page on www.genebenson.com. Benson has some specific botched go around incidences on his page.
The Go Around Decision
I’ve said it previously, but longtime aviators as well as new people need to hear this point loud and clear: Go Arounds are FREE! What I mean is that a go around is not an indicator of bad piloting. The go around IS an indicator of superior judgement on the part of the aviator. Being a superior aviator is not just about stick and rudder skills, which are important. It is also about superior ‘headwork,’ so please avoid the short circuit between the headset ear cups.
As covered in Part 4, but which needs repeating, the ‘big picture’ here is that the best way to win a knife fight in an alley is “DON’T GO IN THE ALLEY!” Once you are in a bad alley the fight gets harder and requires a higher and higher level of skill to prevail. Not going into the bad alley at all, or backing out before you are in too deep, requires a lot less skill. It is part of what martial arts phenomenon Bruce Lee called “the art of fighting without fighting.”
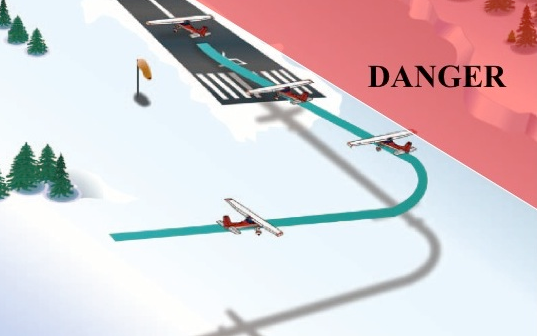
For instance, in the illustration to the right from the FAA Airplane Flying Handbook I have added a red DANGER area. That red area is a bad alley.
Unless the engine has quit we DO NOT HAVE TO make this landing. Avoid ‘target fixation.’ How we got into that bad alley does not matter. If we find ourselves in the red area we should abandon the landing and go around.
As they said in ‘Top Gun,’ “…don’t push a bad position. Select zone 5 (afterburner), extend, and escape.” As we discussed in Part 4, extend, escape, reacquire the necessary position and energy state, then re-engage. Yes, it is just a movie, but that statement was gleaned from the Top Gun school, and that statement says it all.
There are many criteria for a safe landing, like the statement that the landing must occur within the first 3rd of the runway, or that you must be on speed, for example. The airplane’s position and energy state may not be able meet those criteria due to reasons beyond the pilot’s control, such as a wind change. I’ve had situations, both privately and in the airline realm, where a controller, or the airplane in front of us, inadvertently squeezed us into a situation that ended in a go around.
Distractions and decision-making mistakes are well covered in Advisory Circular 61-67C, titled “Stall and Spin Awareness Training.” Paragraph 101 of AC 61-67C says “…..Pilots at all skill levels should be aware of the increased risk of entering into an inadvertent stall or spin while performing tasks that are secondary to controlling the aircraft.” (Italics mine).
Pilots, especially new pilots, have a problem initiating a go around for a few reasons. One is that they (incorrectly) feel that everyone is watching, wondering what failure of ability caused the pilot to not be able to complete the landing.
This is one reason we have crashes at Oshkosh (EAA AirVenture), because everyone IS watching, and they’re almost all pilots. Talk about pressure! So they don’t go around when they should. Another big reason is the target fixation on completing the landing that occurs in any pilot. Plus, we pilots as a group don’t like to ‘give up’ on anything.
All of the above can cause us to stall the aircraft, or get into a spin entry.
That is a lot of mental weight, especially for a new pilot. To answer that I would challenge all pilots with the following: “Do you have the moral courage to go around, even though everyone is watching?”
Could you go around at Oshkosh? It’s not easy to go around, and we should all recognize that. You must steel yourself beforehand to initiate the go around when needed. Even in the airline world we are struggling with this problem.
If you have been taught from the beginning that go arounds are an indicator of good judgement, which also means good piloting, you will have an easier time pushing that throttle up and abandoning the landing.
Busting the chops of fellow pilots is a time honored tradition, which takes constant practice to do well. But let’s treat go arounds as off-limits. When pilots correctly see a go around as a good thing, feel more free to do so, and get positive reinforcement when they do, that will directly impact flying safety in a positive way.
Please, be a part of the safety culture and give a pat on the back to those who go around. It might have been one of the hardest decisions they’ve had to make.
Go Around Procedures - General
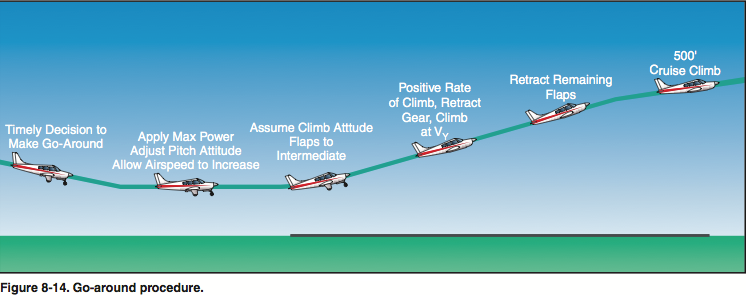
What follows is the generic go around procedure from chapter 8 of the FAA AFH, where they bring up what they call the 3 cardinal principles of the go around: power, attitude, and configuration. Check your Airplane Flight Manual (AFM) to see if they have a specific procedure that differs from the generic one. Many of us bounce around between different airplanes. The go around procedure in one aircraft may not be the same as in another. See the FAA illustration below.
Power and Attitude go together once the decision to go around is made. Full power must be applied immediately, but smoothly. Don’t forget to get rid of the carb heat if it is on, and the propeller control should be forward (if you have one). Get the mixture forward if it isn’t already.
Most airplane landing checklists bring the propeller control to low pitch/high rpm and the mixture to rich in preparation for a possible go around. For those without printed checklists the GUMPS mnemonic vocal checklist (Gas-fullest tank, Undercarriage-down, Mixture-rich, Propeller-high rpm, Seatbelts/Shoulder Harnesses/Switches-on/as required) will take care of most of these items ahead of time.
Add power smoothly enough so the engine doesn’t falter or overboost.
Enough right rudder (in a clockwise turning American engine) must be added so that no change in heading occurs as power is added. Left rudder must be added for Russian or British engines.
Also, enough forward pressure must be added so the airplane doesn’t pitch up into an unsafe attitude due to trim. More on that later.
Make sure you are not sitting so far back that you cannot add the necessary rudder and elevator. Make sure the seat is firmly locked in position. We’ve had accidents where the seat slid full back once power was added, keeping the pilot from adding the forward pressure and rudder needed.
Don’t be in a hurry to start your climb. As you see in the picture above, the first thing you should do is level off and gain some speed before beginning the climb. That makes pitch a 2-stage process – level first, power, gain airspeed, configuration, then climb.
Your approach speed with full flaps may be too slow for a climb with partial flaps. Don’t try to climb prematurely and stall the airplane. More speed will also help with making the rudder more effective against the power-generated turning tendencies.
Pitching to level flight while adding full power is important for another reason. If you just add power without pitching to a level flight attitude you will just be going downhill faster.
Trim Stall, Trimming, and Where to Look
Now we must address trim and the “trim stall” possibility. With the trim set for the approach, with low, or idle thrust, the addition of full power is going to cause the airplane to pitch up strongly. Accidents have occurred on the go around as power was added because the pilots did not push hard enough on the stick or yoke to stop the pitch up. The stall, and the yaw from power due to failure to add enough rudder, came soon after. The result was a crash beside the runway.
The FAA suggests a “rough trim” at this point. The more horsepower you have, the harder the pitch up will be to fight. After you level off and attain a safe airspeed, get rid of most of the adverse elevator forces with a coarse adjustment of your trim control. A final trim can be done later when things have stabilized in the climb.
The power/attitude elements bring up another question. Where are you looking during the go-around?? Assuming you are in VMC, as you begin the go around maneuver you must quickly get your vision out to the horizon. Only in looking out ahead of the aircraft, as far in front of the aircraft as you can, will you see what your pitch attitude is and if your aircraft is holding heading.
Practice where you look as you practice your go arounds. The pilot has a high workload in the beginning phase of the go around, and attention must be in the right place to “fly the airplane” successfully. Many pilots are way more “head down” inside the cockpit than they should be during their go arounds.
Go Around Procedures – Flaps and Gear
Deal with the flaps first, then the gear. From the FAA AFH Ch 8: “Unless otherwise specified in the AFM/POH, it is generally recommended that the flaps be retracted (at least partially) before retracting the landing gear—for two reasons. First, on most airplanes full flaps produce more drag than the landing gear; and second, in case the airplane should inadvertently touch down as the go-around is initiated, it is most desirable to have the landing gear in the down-and-locked position. After a positive rate of climb is established, the landing gear can be retracted.”
After the level off is accomplished and some speed is gained, go to a partial flap setting or the takeoff flap setting, as recommended by the manufacturer’s AFM. The Cessna 150’s and 172 want you to go immediately to flaps 20, for example. Most Pipers want the last notch of flaps removed. Don’t retract the flaps all the way at this point. That could cause the airplane to stall or settle into the ground. Retract the rest of the flaps later, during the climbout, and in increments.
Additional Go Around Decision Factors
The decision to go around must be made early enough so that obstacle problems are avoided. Make allowances for a heavy airplane, a hot day, or a small engine. Late go arounds can lead to not clearing trees or obstacles off the end of the runway – and stalling trying to get over them. As an example, one pilot was landing too far down the runway and was too fast. He started the go around late, when well down the runway, and collided with trees.
Each approach and landing must be evaluated separately, and your planning brain must be sizing up the situation each time.
Is the airplane going to be able to land in the first 3rd of the runway? Is the approach stabilized? Is field short, downhill, or does it have obstacles off the end? Is the Density Altitude high, or is the engine small?
If so, go around sooner.
Keep your mind ahead of the airplane, grasshopper. Come up with a point where you would go around if you are not stabilized, meaning configured and on speed, or it looks like you won’t make your desired touchdown point. Don’t wait until 20’. It could be something like 300’ or 400’ AGL, on final. Take a breather, break your target lock, and see if you should keep going, avoiding target fixation. Build that decision point in.
Most of the airlines have now done so, even on visual approaches. Visual approaches are the most likely to be unstable. Airlines now require a stable point in space, usually 1000 ft AGL on the approach. You must be on the glideslope, glidepath, or PAPI, you must be fully configured, on speed, and have the Before Landing checklist completed. Both pilots must call out “stable.”
If any of these conditions are not met a go around must be performed. Also, any crewmember can call for the go around, and it HAS to be honored.
Remember the military’s 6 “P’s.” Proper Planning Prevents Piss-Poor Performance! Proper planning doesn’t just mean planning on the ground. Here it also means planning 10-20 seconds ahead of the aircrafts’ position.
What About Other Traffic, Wake Turbulence, and ATC?
To make matters worse, the go around is not always a solo operation. During a go around you may be dancing with another aircraft.

At many busier tower airports, whether they be corporate or airline-type airports, the controllers will run the departures and arrivals quite tightly. What would happen if something required you, the landing aircraft, to go around? Now you could be conflicting with the departing aircraft.
If there is a single runway you may have departing traffic rolling and lifting off only a little bit before you are about to touch down. With two close parallel runways an aircraft may be lifting off on the next runway just as you are about to land. These conditions could also occur at a busy non-tower airport.
In the case of a go around you may be accelerating into the airspace that the departing aircraft is trying to occupy. First of all, keep the other guy in sight. As the fighter pilots say, “Lose sight, lose fight.” You may also have to side-step a bit to keep the other aircraft in sight. Have you thought about which direction you might side-step before it is required?? Always have an “out.”
The FAA is now issuing instructions to ATC to modify their procedures so that a go around by the landing aircraft does not cause a traffic conflict with departing traffic. You as the PIC, however, should be thinking about a possible go around on every landing.
You also need to think about wake turbulence. Make sure you are not flying into the wake of the departing aircraft.
Maneuvering Margins and Airspeed Maintenance
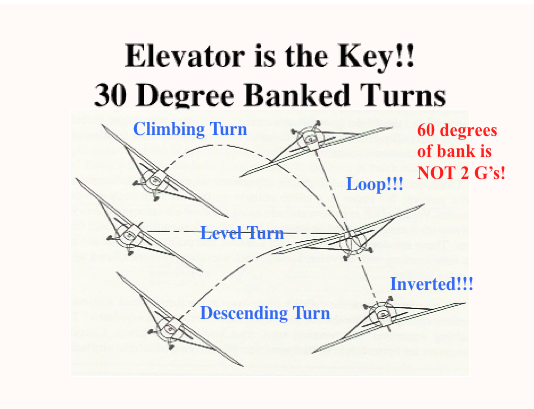
The following statement is not completely correct, but it has made people afraid to bank the aircraft: That 60 degrees of bank is 2g’s, with a 40% increase in stall speed. 60 degrees of bank is actually NOT 2g’s. 60 degrees of bank, with enough back elevator to hold altitude, THAT puts 2g’s of load on the aircraft. It is about the elevator, not the bank. If you roll into 60 degrees of bank but don’t pull back hard and are in a descending turn, you are putting less than 2g’s on the aircraft.
Since people are afraid to bank the aircraft, they are more likely to stop banking and start “ruddering the nose around,” which is how the spin begins. While maneuvering you MUST remain coordinated.
You can see in the illustration to the right, from Rich Stowell’s EMT manual, that all of the aircraft below have 30 degrees of bank. The starting aircraft is in the center on the right. From there you either go up, or down, or over to the left.
The g-load, however is different in every case depending on the elevator position, which sets the angle of attack, or AOA, of the main wing. That AOA multiplied by the air velocity squared and the air density creates the pounds of lift force.
Those pounds of lift force, acting perpendicular to the wing, and compared to the airplanes’ resting weight, creates your g-load. 1500 lbs of lift against a resting weight of 1000 lbs = 1.5 g’s of load factor. Easy.
That load factor affects your body as well. In my previous example you would also feel 1.5 times heavier than your normal weight. You are in fact a carbon-based g meter. Learn to be sensitive to that heaviness. You feel the load factor the airplane feels. Since you are in charge of the elevator you are in charge of the g-load.
Where you point your perpendicular lift arrow is controlled by your bank angle.
Don’t be afraid of 45 degrees of bank. 45 degrees of bank, with enough back elevator to hold level flight, puts 1.4g’s of load on the aircraft. That amount of back pressure will increase the stall speed 18%, not 30 – 40%. 30 degrees of bank, with enough back elevator to hold level flight, increases stall speed 8%.
Remember, 45 degrees = 18%. 30 degrees = 8%. Those are better numbers to memorize. You could round them up to 20% and 10% if you wish.
The normal approach speeds in the manual for Best Glide speed, Vbg, clean, and for each flap setting are approximately 30% over that particular stall speed. That is your maneuvering buffer. At 45 degrees of bank, if adding enough elevator to hold level flight, that gives you a 12% margin over stall. More if you’re descending.
Am I suggesting we do all of our turns in the pattern or on the go around at 45 degrees of bank? Of course not. But I am informing you that you have more margin while banking than you may realize. But you have to stay coordinated at all costs. Fear of the increase in stall speed from banking causes people to stop banking and start “rudder-ing the nose around.”
No excess of yaw = No Yaw-Roll Coupling. No Yaw-Roll Coupling = No spin.
Adding a few extra knots on top of approach speed, like +5, is a good idea when doing a lot of maneuvering or when flying in gusting conditions. That is why it is so important to maintain your airspeed as you maneuver. Don’t get slow!
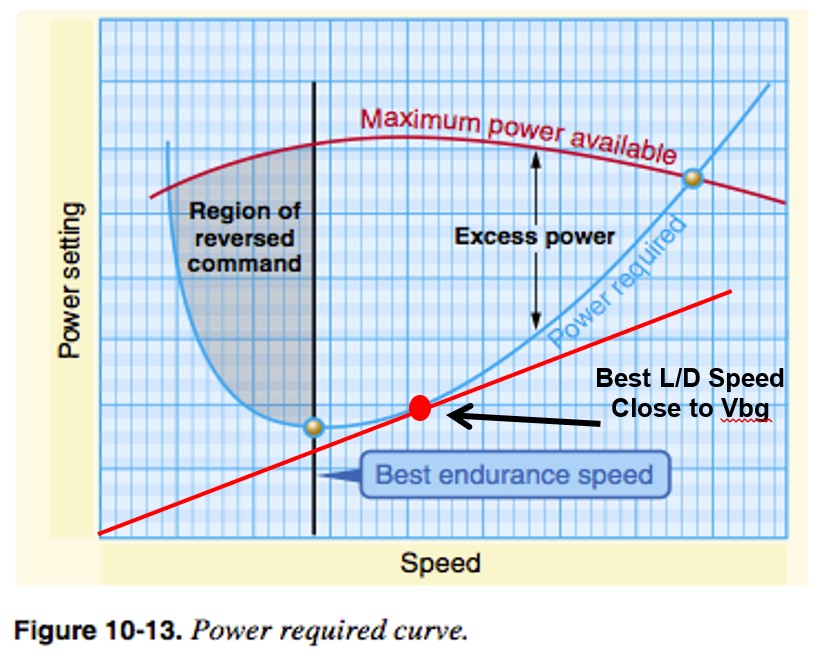
Looking at the drag curve to the right for a clean wing, approach speed is a little faster than best endurance speed shown. The curves for each flap setting look similar. Stay at or above approach speed for that flap setting, and stay out of the area of reverse command. The drag on the airplane rises exponentially there, giving less excess power to get out of a bad spot.
Summary
So, if the pilot is thinking far enough ahead of the aircraft they can usually see an unsafe situation developing early. Listening to the radio can also give early clues. If so, the pilot can either slow down to minimum safe approach speed, modify the approach pattern, or go around.
Again, the earlier the decision to go around can be made, the less heart-stopping it can be to all concerned.
Lastly, don’t fly too slow.
As the tongue-in-cheek saying goes, “Lose not thy airspeed, lest the ground rise up and smite thee.” Getting slow while being distracted by other things can be a killer.
Oshkosh arrivals are an extreme example, where crashes have occurred when a pilot got slow, or “rudder-ed the nose around” causing a spin entry.
Do you have the moral courage to go around while every pilot in the world is watching?
So, the “simple” go around is not so simple, and it must be thought about and practiced like any other important maneuver. It is your “get out of jail free” card. You might want to keep that baby dusted off.
Thank you for attending. Please see the other parts of this series.
Part 1 | Part 2 | Part 3 | Part 4